And SeedWorld is back… and on MonoGame

My hobby programming plate was kind of full at one moment. In addition to the game idea I have for Project SeedWorld, I have started working on a Pong-based game for Mini LD 58, and I also have my open-source Bummerman game. Though not a serious project, I plan to hold on to it to learn multiplayer networking code. Mini LD is already over, so I can go back to work “full-time” on the voxel game. I already have it working in a MonoGame project now.

Posted Image

Putting all the Code Together

Between this and other small games I have worked on in the past I have seen a familiar codebase develop over time and started to see what others mean about deferring your plans on building a game engine. Most recently with the voxel game, and even before then, making pet projects I haven’t shown in public.

Over time, I have developed a “Screen Element” system which works like Game State management, but there is no manager class, and I prefer to call them Game Screens or Screen Elements. With Bummerman, I also have a custom ECS framework that works for this particular game but I have copied the code over to start making the platformer.

So I have two sets of code that I notice I can copy to other projects, in two separate folders. One is for the ECS and the other for Screen Elements. I can then start with a Game class that loads the first Screen Element for the game and in the main gameplay logic use ECS.

Porting SeedWorld to MonoGame

Today I have started work on taking the important voxel engine code and updating it to run with a game using the ECS and MonoGame. It’s a success so far! Project SeedWorld can now go multi-platform.

I am not using procedural noise functions this time around. This game will be made using custom tiles, which are represented as 16x16x16 chunks. Right now I am still using voxel streaming to load and unload chunks, but that may change soon as it’s not completely necessary now. As before, it loops through all the possible chunk areas to see if any need updating.

Tile information will be handled in the ECS framework. First, a Level object will read tile data, which is just a series of number IDs that point to voxel object files. A Tile component will store the tile position, tile ID and rotation. It will also be accompanied with a Collision component. I may not want voxel-perfect precision but instead have hit areas represented with simpler shapes.

Finally

By the way, MonoGame has one big annoyance: It has no built in SMAA support! You’ll have fix it the hard way by adding this feature to the source, get around it with a post-process shader, or be more gutsy like I was and use a super-sampled render target at 2x the native resolution (in other words, 4k resolution!)

Posted Image

If you compare it to the first screenshot, it actually did not drop the framerate much at all. This is at 3840×2160 downscaled to 1920×1080, running on a GTX 750Ti. But it becomes more GPU bound when I started rendering a lot more chunks. Below it is rendering at 720p downscaled from 1440p.

Posted Image

This is because of the number of draw calls of one per chunk, just the way it was when using XNA. But I think this time I will combine several chunks into one mesh to reduce the draw calls. In the meantime, I will be working on a voxel tile loader so it can generate pre-made chunks from voxel sprites. It will basically be a tile editor but in 3D. I want to give the players the ability to customize and make their own maps with the game.

Hopefully soon I will be able to show the process of making a map with the tile editor and show some of the game features with it.

Tagged with: ,
Posted in Engine, Graphics

A New Direction

Project SeedWorld has been put on the side for a couple of weeks. What really happened is that I needed to reconsider the scope of my project. I felt out of my depth. See, what I really wanted to make all along is something like Cube World but with a different set of game features and more focused questing, and the added perk of being regularly updated by yours truly. But that didn’t end up going the smooth trail I wanted it to be.

For most of the project I was working on getting the voxel generation and rendering engine to work well and mostly bug-free. It can now render large procedural landscapes. Physics is all custom made and I can make a player avatar walk and jump around in the world. I finished fixing the last major graphical bug that it had and then- well I have a large world. That I can run and jump in. Suddenly I felt overwhelmed with how much more I still had to do.

I started adding some GUI code to test rendering and controls, but I needed to add something that resembles gameplay, even if it were the most vague. I could throw in a bunch of objects into the world, what they are isn’t important, but just to make the player pick them up. But I needed to add an inventory menu to track those objects. I felt that it wasn’t interesting enough.

A Change of Genre

I have also been taking a look at other games (completed and in-progress) to inspire me, and in particular voxel games such as Staxel and The Deer God has been so influential for making the decision to scale down my game. So as of now Project SeedWorld will be a platform game in the vein of the 2D Super Mario games. It might still have item management and RPG-like progress elements, but most of the focus will be on run-and-jump platforming action. I think I would have more fun making a game of this genre, and also stand a greater chance of making the game fun.

But the voxels will stay. I am gonna keep most of my voxel engine as it is, just with changes necessary to fulfill the needs of making a platform game. Voxels will be reduced in size, so it will be like Staxel. I will probably restrict the movement to mostly 2D, but graphics will still be full 3D. Just now with the added benefit of being portable with MonoGame (possibly the next big challenge).

Will the worlds/levels be procedurally made? That depends on how easy it is to making procedural levels for a platform game. I’ve researched a bit and read an article or two, and it’s not like throwing a bunch of noise functions and tweak their parameters till you get something that looks nice. The world generation will depend greatly on the actions of the player, knowing where to place platforms that are accessible, obstacles where appropriate, a decent flow of challenge, and this could mean many, MANY hours of play testing.

So there you have it, and now begins my work with a new type of game. Guess I just needed a break again from the project to think more clearly on what I should do. Also, because I already have most of the voxel engine already made, hopefully the start will be a lot easier.

Posted in Engine, Gameplay

Voxel lighting problem solved

I have fixed a problem that has bugged me for quite some time. For most of the development of SeedWorld, up until last week, every chunk was not able to access voxels from immediate neighbors. This shortcoming was avoided with the code for voxel collisions, which worked by finding the right chunk from the group of chunks to test whether a block is solid or empty, given world coordinates as input. But sometimes you needed to find out based on local coordinates, relative to a chunk’s location. This was evident in the mesh building process, as it did ray casting from each visible voxel to determine if a voxel needs to be shaded darker, and by how much.

The edge voxels were a problem for raycasting since it could not raycast further out from the edges of the chunk. Any rays that reached the edge were considered “not blocked” and the voxel received full light. This created a seam of lighter colored voxels around the edges.

20150214-banding1

Now since each chunk now has access to its eight neighbors surrounding the sides, you can simply make the ray “step into” these chunks and continue traveling the distance it’s supposed to instead of ending prematurely. My first attempt to fix this didn’t go well. I was modifying the starting coordinates of each ray and using that to find the neighbor chunk. It ended up looking worse:

20150214-banding2

These seams appeared because the ray was checking against the solid voxel it started from. So it always subtracted contribution from the light, making the edges dark. This was fixed by updating the ray coordinates after each step, seeing if they go out of bounds (from 0 to 32) and then picking the correct neighbor chunk to continue and reset the local coordinates. Now the seams are gone and the shading is correct.

20150214-no-banding

Now the chunks don’t look as obvious. This was pretty satisfying to fix, and probably so much that I will move on to work on other parts of the game. There are still visible seams at height intervals (because rays don’t have neighbors to check on the Y axis) but this is still a lot better than seeing an entire grid of lines going across the landscape. So it’s not something I am focused on improving at the moment.

As for what I will be working on next, I have been looking at some UI libraries to see which I will add into the game. I’ve already picked one to try for the moment, and if it is easy enough to use without having to break or re-code a large part of my game, I’ll stick with it and start adding some game features.

Tagged with: ,
Posted in Engine, Graphics

Chunks are proper cubes now. Also, an upcoming shooter game

Here’s a shorter update, but sorry, no pics this time. I’ve spent a lot of time in the voxel chunk rendering code, perhaps too much time, but part of it has to do with converting chunks to 32x32x32 size.

Previously, every chunk was 32x256x32 in size (256 being the height). That seemed like a good idea at the time, so I could query only X and Z in world coordinates and not worry about height when it comes to lighting or neighbors. But it took too long to generate one chunk in my old laptop, which I want to use as a baseline spec for running games on older hardware. So I redid everything in the chunk management code.

It took a while but it was worth the trouble. Chunks are now cubic, and still queried individually for collision detection and rendering, but with more granularity in loading times. Making voxels from 3D noise is no longer prohibitively expensive which was also a very nice thing to discover.

Chunks with the same X and Z coordinates are grouped in a class called ChunkStack. For 256 units in height each ChunkStack contains 8 chunks. This class makes it easier to organize chunks by distance so I have 8 times less things to order, and also have it share the same 2-dimensional data for generating the chunk in each stack (so I don’t have to redraw the same portion of a height map or a biome map 8 times, for the 8 chunks). With the height data, an average height can be computed in order to find a good max and minimum height for each ChunkStack. In theory this would permit for worlds with heights that can span thousands of units, despite the stacks themselves being limited in height.

Finally, I added the ability for a chunk to connect to its up to 8 neighbors (on the sides and corners) and this is where loading and rendering meshes can get very flexible. It’s already working in that mesh creation is deferred until a 3×3 area of chunk voxels are loaded. This will aid in fixing the seams in shading that appear on the chunk borders.

Continuing on an Old Game

In non-voxel related news, I’m thinking of going back to finish the top-down shooter game which I barely started. It was supposed to the way I was going to go back into XNA programming, but designing the game with ECS in mind bogged me down so I’m gonna do away with it completely for this game. The most I have managed to do with it is move a 3D model around an empty room. But this game should be something I should be able to finish in a short time, so this will not be a big sidetrack from my voxel game. Just something I want to do quick and dirty, and still be enjoyable. Maybe it’ll be done as a challenge for One Game A Month.

Unlike last time, 3D will not be a hard requirement this time around, but just a potential upgrade after finishing the game in 2D. The game will be, as originally planned, a twitch combat style shooter with multiplayer support. Graphics will be more pixelated/retro in style with grayscale colors.

Tagged with: ,
Posted in Engine, Game Physics

Loading Voxel Models into the Game

I didn’t get as much time as I wanted to work on my game last week. Spent too much time with Skyrim (coming very late to the game, but nonetheless). Still there are some new updates to show. First I have re-opened my Twitter account for game dev related stuff, so make sure to follow me there. Also, I am now able to load models created with the MagicaVoxel editor, which will likely take a big part of my game development time in the future.

I discovered MagicaVoxel from Giawa’s dev blog, and he already made some code models into his program, which is alreadyavailable for use. After modifying the code a bit, I was able to get a model loading correctly into my game. I had to flip some coordinate values around, because Magica treats Z axis as vertical, while I use the Y axis for that. Also, I had trouble expanding the 16-bit color values back into a 32-bit integer. The colors were approximate but still looked off, especially with skin tones and lighter colors. So my importer code stores voxels with 24-bit color values. Here is a comparison with the model in Magica and in the game with my importer:

Posted Image

Models made with Magica use a palette of 256 colors which can be user-defined. My model format in the game uses the first 768 bytes to store the RGB values for the palette (alpha not supported yet), and the rest of the bytes are X, Y, Z and color index for each solid voxel. At the end I store two more X, Y, Z locations to get the bounding box of the model. This helps me center and position it for player movement.

The code for converting the voxels to meshes is a lot like the code for the chunk meshes. The process is split up into three steps – copy all voxels to a 3D array, cull visible voxels, and finally check neighbors to make the voxel cubes with the right combination of sides.

As with the chunks, each step is also thread-able to speed up loading of models. It now seems possible to condense a lot of this code into one generic class or set of functions that can work with any kind of voxel object. But the code still needs more cleaning up in order to make this happen.
One trick I use to make this code more readable is to pad the voxel array with a 1 unit “wall” of empty voxels on each side. For example, if I want to import a model 32x32x128 in size, I load it into a 34x34x130 array. Then instead of looping from 0 to 31 or 0 to 127, I loop from 1 to 32, 1 to 128, etc. This way I can guarantee that each voxel in the model doesn’t have any neighbors that fall out of bounds in the array.

Posted Image

Now it’s time for me to get a bit creative. Time to start making my own voxel models for the landscape, as I will be adding grass, bushes, etc. and coming up with items that can be picked up.

Tagged with: ,
Posted in Engine, Graphics

Adding Biomes and Rivers

This week I have been working on adding more natural features- rivers and biomes (or at least the start of it). As part of making the world more varied and less same-y, I decided it’s a good time to add bodies of water! I thought about oceans but I wasn’t sure yet on how to modify the height on a large scale. I want to support negative height values for underwater oceans but the voxel engine doesn’t support it yet.

So I went with rivers. I took the simple way out for this and used the same noise functions I’ve been using for everything else. Eventually I settled on a stripped down version of the pattern used for the big mountains so that rivers naturally travel in the valleys and creases between them.

Posted Image

There is also a bit of erosion added, which is more visible in the flatter, lower areas. Noise values are converted to absolute values (all negatives become flipped) so areas near 0 are lowered in height and the closest to 0 areas are where the rivers are made.

Posted Image

(The more eagle-eyed lot might notice some faint grid lines running along the mountains- this is a visual bug related to raycasting unable to access voxel info from adjacent chunks. This would be fixed eventually.)

I want to fix this also for steeper areas because the water looks a bit odd taking on the shape of the mountains. But it’s a good start. The rivers tend to travel more in the flatter areas, because I put a hard cap on height on where they begin.

And then come biomes. These depend on a set of variables also provided by, yep, noise functions. A set of Simplex noise patterns with very low frequencies have subtle changes on the local scale (from the player’s point of view) but are very apparent across the entire world. They’re essentially the same patterns that made the world maps in this previous post. And so they will affect other things such as humidity and temperature. Biomes affect the color of Surface blocks and eventually, vegetation, enemy types and materials scattered around.

My approach to biomes will not be to use different classes for different biomes, or even divide the world up into discrete regions. Instead the regions will be formed implicitly by the noise patterns. I will go in detail more as I flesh out the biome system later. Here is an example of a desert biome.

Posted Image

For now, I just hardcoded the terrain to show the desert biome using the desert surface colors. What I really wanted to show here is how rivers change the humidity on a very local level. If we look at the other side of the peak we can see some sort of an oasis.

Posted Image

Humidity in this case can also mean the moisture level in the ground. Areas are grassy around rivers, even in the desert. With smart object placement, there will also be shrubs and trees in these areas.

Posted Image

That’s all for now. I want to get the biome rules more defined in order to make the biomes transition well over different parts of the world.

Tagged with: , , ,
Posted in Engine, Graphics

Day/Night Cycle

Here’s a quick update this time. This time I have implemented a day/night cycle for the game. It’s not physically accurate but it looks good enough. This short video demonstrates it.

There is now a skydome in the background, which uses a lookup texture to get the colors based on the time of day and altitude of the sky. The objects become bright and dark based on the time of day using a sine function, which I added various coefficients in order to get the transitions looking how I want them to. The objects also are also light differently with ambient colors based on the sky and light angle.

There are a few adjustments still to be made with the sky colors. I’m considering using another lookup texture to get the brightness of the objects which would replace the sine function operations, and much easier to adjust.

I’ve also been working on some code cleanup and re-organization. Chunks are now handled as a group with a ChunkManager class, which makes the code in the game state much easier to read through. Some tweaked camera physics and controls, as well as voxel shader code.

Tagged with: ,
Posted in Graphics

Map Making and Model Batching

It’s now month two of the development of my SeedWorld engine and the game it will be used for. In the first month I have already made a lot of progress for it. The features I’ve done that month are:

  • A voxel rendering system to draw a world out of cubes
  • Procedural generation of landscape and trees using noise and shape functions
  • Optimized loading and streaming of voxel chunks, including multithreading
  • Move a box around the world, interacting via physics and collision detection

The engine is shaping up to be a good tech demo already, so here’s hoping for another productive month. This week I’ve already pushed two more features, one being a rendering code change and the other one is completely new and related to world generation. So get ready for a long post, there is a lot to cover here.

Building a larger world

First I will talk about the world map generation. No doubt many people who wondered how to procedurally generate a world map have ran across Amit P’s article on polygonal map generation. I wanted to run with some of these ideas and kept them in the back of my head. Turns out that someone already made an XNA implementation of Amit’s code to make randomized 3D islands with it. I downloaded the source and ran the program, but in the end the code was too overkill for me. I have to start with something more simple. Here is a picture of a finished map with the results of work I did in one night.

Posted Image

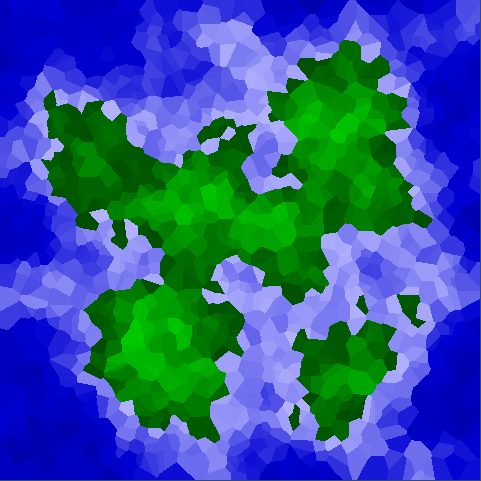
With that said, I did not follow Amit’s approach to make islands, not even closely. But I do know I wanted to generate the map using Voronoi diagrams. Also, I will eventually add specific biomes for the map, which is one of the reasons why I am doing this. The world will be big but finite, and heights and biomes will affect the way voxels are drawn and rendered from the player’s point of view.

I made a new ScreenElement class for my game’s Screen System to put all my code in and test it. The awesome thing about using a system for game states or screen states is that you can experiment with things in a stand-alone state like a mini program. To generate the height map, I use the same Simplex noise functions, but layering on just two noise patterns of different frequencies. Then I add a height mask to lower the elevation on the edges of the map, so all sides are surrounded by ocean.

The noise function and region plotter take a seed to generate the map, and pressing a key generates a new map from a new random seed. They are all made by pseudo random number generator, so the same starting seed gives you the same list of maps every time. The process takes a couple of seconds to make a map of the size above, but this will only be done once per new game when a new seed is chosen.

Batching the models

After deciding I’m good for now on the maps, and get to the biomes later, I moved on to plan rendering of object models other than the chunks of voxels/blocks. Since the beginning, the Chunk class had its own Draw function to render the mesh with. The wireframe box used to test movement in the world is drawn with a BoundingBoxRenderer class.

This was not going to scale well with different kinds of objects like monsters, items or NPCs, so I decided, before I can even begin to turn that wireframe box that represents the player to a solid one, I should refactor my rendering code to be more flexible. I took ideas from the XNA SpriteBatch class to draw models in batches, taking in their transformations and current effect and drawing it in one go. The default way is to defer rendering of sprites until you call SpriteBatch.End().

Similarly I created a ModelBatch class that loads different meshes to a Dictionary structure, using meshes as keys and lists of matrices as the values. This way several transforms can apply to one mesh to render the mesh more than once. Like SpriteBatch, you can start and end it a few times each frame to separate the batches by effect or render state. This gives you a more organized way to render different groups of objects with different effects. The ModelBatch pseudocode is as follows, as briefly as I can describe it:

class MeshData
{
    public IndexBuffer ib;
    public VertexBuffer vb;
    public BoundingBox bBox;
}

class ModelBatch
{
    private Dictionary<MeshData, List<Matrix>> meshInstances, cachedMeshInstances;
    private Queue<MeshData> meshQueue;

    private int initialBatchSize = // some large enough number

    // Other rendering resources such as graphics device, current effect,
    // current camera and renderStates go here

    public ModelBatch(GraphicsDevice)
    {
         // Initialize data structures, reserving a size for each with initialBatchSize
         // Queue gets size initialBatchSize + 1 for insertion purposes
         // Set GraphicsDevice
    }

    public Begin(Camera, Effect, RenderStates etc.)
    {
         // Set current effect, camera and renderStates here.
         // RenderStates can be applied here instead of in Draw()
    }

    public Add(MeshData, Matrix)
    {
         // Matrix is the world transformation for a mesh
         // Search meshInstances for a matching MeshData object
         // If found, add the Matrix transform to its Matrix list

         // If not found, search cachedMeshInstances for a match
         // If found in cachedMeshInstances, clear Matrix list and copy to meshInstances
         // If not found in cachedMeshInstances, add MeshData and new Matrix list
         //    to meshInstances
    }

    public Draw()
    {
         // Set effect parameters that apply uniformly for the whole batch
         // (camera view, projection, etc.) For now, the default technique applies.

         // For each MeshData and Matrix list in meshInstances
         //     set vertex and index buffers

         //     For each Matrix in Matrix list
         //         Set world transform for the effect
         //         If in frustum view, draw the mesh with this transform

         //     Finished rendering instances for this mesh, check if it's present
         //     in cachedMeshInstances. If not found, add it to the cache.

         // Done drawing all meshes, clear meshInstances
    }
}

Some things not mentioned in the code are checking for null index buffers and vertex buffers, frustum culling details and using the meshQueue to limit cache size. The last one is important enough to mention, though.

First, I decided to use caching because frequently emptying and re-filling a Dictionary with a large number of meshes (such as the voxel chunk meshes) adds a lot of memory to the managed heap, calling in the garbage collector every couple of frames. Before switching to this code, the Chunk objects always kept a local copy of the mesh and didn’t need to pass it anywhere else so this wasn’t a problem until now.

This is why the Add function checks the cache Dictionary first, so it can avoid copying a reference to a MeshData object and just reuse the old one. It’s not guaranteed if the matrix transformations remained unchanged from the last frame, though, so these always get newly copied.

The Queue of MeshData is for keeping a constant size for the cache. Without it, the cache won’t function properly and the ModelBatch will continue to grow the cache as it finds more unique meshes to render. This becomes a problem as you move through the world and new Chunk meshes need to be created, as well as other meshes for different monsters and randomly made NPCs.

For it to work properly, the cache should remove the oldest MeshData to make room for a new one. The MeshData queue does this well, removing the object from the start of the queue in order to remove the oldest object from cachedMeshInstances. The code reads like this:

// Done rendering a mesh, release it to the cached list
if (!cachedMeshInstances.ContainsKey(mesh))
{
    // Add to cache if not found already
    cachedMeshInstances.Add(mesh, new List<Matrix>());

    // Limit cache to batch size if it's reaching the size limit,
    // removing the oldest mesh
    if (meshQueue.Count == initialBatchSize)
        cachedMeshInstances.Remove(meshQueue.Dequeue());

    // Add the new mesh to the queue
    meshQueue.Enqueue(mesh);
}

Additionally, the cache must be set a large enough size so that the game will always have a lot of empty positions to fill meshes with. If the cache is too small, there will always be more unique meshes to render than there are items in the cache, causing the cache to change every frame, even if no new meshes are introduced to the batch.

The queue/cache size depends on the implementation of the scene. For instance, if I know I will have about 2000 chunks rendered at maximum (since the view radius is fixed), I might want to reserve a size of at least 3000 for meshes scattered on the ground, characters and items. This sounds like a lot, but the memory increase from these data structures is not really much compared to the actual mesh data, and most important of all, no frequent heap allocations/deallocations.

Those familar with XNA might notice that the behavior for Draw() is similar to SpriteBatch’s End(), and Add() to SpriteBatch’s Draw(). I chose these function names because they make sense to me, but I’ll probably have them changed to the SpriteBatch names for consistency.

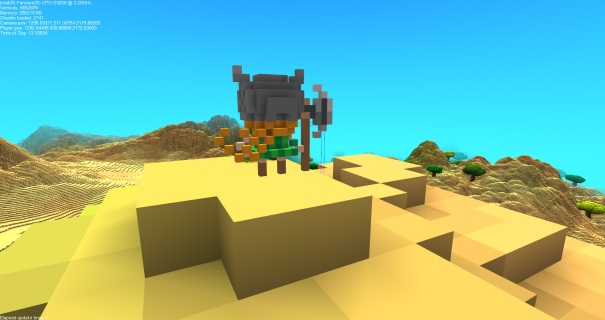
Next I’ll start work on adding mesh support to the Player class in order to have something for the player avatar, using the same ModelBatch to render it.

Tagged with: , , ,
Posted in Engine, Graphics

First video, and more collision response

Started off the new year well with my game. I finally got to the point where my collision box code works almost the way I want it to! I say “almost” because there is one slight bug but nothing really game-breaking. Adapting some code from the XNA platform game sample really helped also. The most difficult part is adding in the Z axis for proper collision response with horizontal movement, and last night I was fudging around with the code a lot until I got it to work predictably and sensibly.

Also, I have uploaded the first video of my voxel engine in action (in 60 FPS to boot). This recording is actually 2 days old, so no collision box demo here.

Since the phsyics code is based on a platforming game sample, I’m also left with many arbitrary numbers for variables to compute things such as drag, jumping time, acceleration, etc. I understand the code in which these numbers affect the movement but I don’t like how the numbers don’t seem to have any meaningful relation with each other. Oh well, at least I can use them for many things, like reducing the drag when you’re on slippery surfaces.

Other updates include some changes to the graphics code to get it to work with the XNA Reach profile. This didn’t involve many changes, just limiting the number of vertices in each buffer to a 16-bit amount and changing some shader semantics. I really want to keep this compatibility, because I want the visuals to be simple yet still look great while running on low-powered graphics cards, in order to attract more potential players. The video above might as well be running on the Reach profile, as it looks exactly the same.

Back to the collision code- the slight bug I found is that when you collide with a wall, you keep sliding in one direction until the bounding box touches the edge of the next block. This only happens moving in one direction along each axis (eg. I can slide indefinitely while increasing on the X axis but not decreasing), but you do not get stuck on the wall, you just stop.

So I can now render a bounding box that moves around in the world and can jump. The camera is still not tied to player movement, and makes movement awkward. So that’s next on the list of things to fix. After that, I will post another video showing it.

Tagged with: ,
Posted in Engine, Game Physics, Graphics

Better trees, lighting, and now, collision detection

This is probably the last entry I’ll add this year, so I hope it’s a good enough one! My SeedWorld engine has now reached a milestone- the first physics code. Also, the trees are generated more realistically and lighting is much improved.

I have raycasting code for emitting rays from every visible voxel and shade it a different darkness, with falloff applied for distance. This is all done on the CPU for now but I would like to use the GPU if possible. Here is a visual example of the ray casting stepped in cubes.

Ray projection

The code still has the limitation of not being able to check voxels of neighbor chunks, but the falloff of shade is so great you’d hardly notice these inconsistencies unless you look straight up at the bottom of an overhang (such as under a tree). I want to correct that later.

Also, some normal-based ambient lighting! It is simple but can have a drastic effect on the image. Each side of the cube can be lit with a different ambient color, so it is like sampling indirect lighting from a sky box texture but much simpler since cubes have only 6 sides. This Wolfire article gives a simple explanation of how it works. It looks much better than having the same dull gray color on all sides. Diffuse colors are also gamma corrected on the shader.

Here is a scene showing just the ambient lighting added to the regular shading from the normals:

20141229-ambient1

And the same scene with the diffuse color multiplied:

20141229-ambient2

Colors pop out a lot more now, everything looks more vivid which is the look I am going for. The ambient colors are hardcoded for now, but will be dynamic when I get a day/night system going. Colors are still too bright, but that was fixed. The lighting was adjusted some more.

20141229-ambient4

Also you may notice that the trees are a bit more complex in shape, at least with the leaves. I generate the “boughs” in random sizes from the center, going in a fixed radial pattern. Each tree can have from 4 to 7 of them. This makes better looking trees than just randomly positioning them from the center, which made some trees look very unbalanced.

Shader code is also refined and the vertex data as well. Up until yesterday, all the chunk meshes are rendered with the absolute positions sent to the shader. Now I just send the local positions and transform with a matrix. To be honest, I peeked at the graphics in Cube World for an idea on how it does things, using PIX. Its approach is interesting, because none of the vertices in view exceeded absolute values of 300 in world coordinates, after the vertex shader is applied. It seems that not only does it just use local coordinates but also makes the world “scroll” around the character so as to keep everything near the origin.

Since the cubes are all located in integer coordinates and chunks are all 32 units in size I was able to greatly reduce the number of vertex data to pass to the shader. Each coordinate is now stored in a Byte4 instead of a Vector3, as was the color and normal information. This reduces the vertex size to a svelte 8 bytes. The fourth byte, usually the w component, can be used to store additional information such as AO shading, and possibly material properties that affect how it reflects color. So now the AO is added to the color in the shader instead of “baked in” the vertex. This makes lighting much more flexible to change.

First Collision Detection

Another important step forward in the engine is built-in collision detection. So far all I have to show for it is keeping the camera above the surface of the ground. A bounding box is made around the camera, the code compares the position of the box in the world to get the nearby blocks and checks if any of them is solid for a collision. See, just like 2D tile collision. The collision response is crude- it just moves the camera one unit up when the box collides with the ground. Later on I will add intersection functions to test the depth of intersection, needed to do some meaningful physics with characters and other objects.

The way I get the blocks from the world is kind of crazy. It is a function that actually re-generates all the procedural data required to find out what type of block is in a specific location. For now that just means getting the height value from the noise functions at a particular location, but I’ll add in somehow to check if other objects are being built that will occupy that block so that the camera can collide with the trees as well. The reason it’s done this way is to save time (for now) but also because when chunks are generated, all the block/voxel data stored in the cache falls out of scope after the mesh is made, and is replaced with the data from the next chunk. The chunk objects are mostly left with just the index and vertex buffers to render it.

This way of getting the blocks is actually very quick because the bounding box doesn’t intersect with a lot of them. I’m curious at how well it will work with many moving things on the screen, especially ones almost as big as trees. Fortunately my game will not feature a lot of block creation or destruction, so that helps as well. Eventually, though, I want to store another cache for the nearby block data.

Later on, I’ll start work on the Player class, its collision detection, and also code a camera that can be moved around the player for easy navigation.

Tagged with: , ,
Posted in Engine, Graphics